Getting started with Git and Github
Git Basics
- Git was invented by Linus Torvalds.
Version Control System
- Version Control System (VCS) is a software that helps software developers to work together and maintain a complete history of their work.
- Functions of a VCS:
- Allows developers to work simultaneously.
- Does not allow overwriting each other’s changes.
- Maintains a history of every version.
- Types of VCS:
- Centralized version control system (CVCS).
- Distributed/Decentralized version control system (DVCS).
Centralized version control system (CVCS).
- CVCS uses a central server to store all files and enables team collaboration.
- But the major drawback is its single point of failure, i.e., failure of the central server.
Distributed/Decentralized version control system (DVCS)
- DVCS clients not only check out the latest snapshot of the directory but they also fully mirror the repository.
- If the server goes down, then the repository from any client can be copied back to the server to restore it.
- Every checkout is a full backup of the repository.
- Git does not rely on the central server and that is why we can perform many operations even when we are offline.
- we can commit changes, create branches, view logs, and perform other operations when we are offline.
- We require network connection only to publish our changes and take the latest changes.
Advantages of Git
- Free and open source
- Fast and small
- Implicit backup
- Security
- No need of powerful hardware
- Easier branching
Git Terminologies
Local Repository:
Git provides a private copy of the whole repository. Users can perform many operations with this repository such as add file, remove file, rename file, move file, commit changes, and many more.
Working Directory and Staging Area:
The working directory is the place where files are checked out.Git doesn’t track each and every modified file. Whenever a commit operation is performed, Git looks for the files present in the staging area. Only those files present in the staging area are considered for commit and not all the modified files.
Commits:
Commit holds the current state of the repository. A commit is named by SHA1 hash value. We can consider a commit object as a node of the linked list. Every commit object has a pointer to the parent commit object. From a given commit, we can traverse back by looking at the parent pointer to view the history of the commit. If a commit has multiple parent commits, then that particular commit has been created by merging two branches.
Branches:
Branches are used to create another line of development. By default, Git has a master branch. Usually, a branch is created to work on a new feature. Once the feature is completed, it is merged back with the master branch and we delete the branch. Every branch is referenced by HEAD, which points to the latest commit in the branch. Whenever we make a commit, HEAD is updated with the latest commit.
Tags:
Tag assigns a meaningful name with a specific version in the repository. Tags are very similar to branches, but the difference is that tags are immutable. It means, tag is a branch, which nobody intends to modify. Once a tag is created for a particular commit, even if we create a new commit, it will not be updated. Usually, tags are created for product releases.
Clone:
Clone operation creates the instance of the repository. Clone operation not only checks out the working copy, but it also mirrors the complete repository. Users can perform many operations with this local repository. The only time networking gets involved is when the repository instances are being synchronized.
Pull:
Pull operation copies the changes from a remote repository instance to a local one. It is used for synchronization between two repository instances.
Push:
Push operation copies changes from a local repository instance to a remote one. This is used to store the changes permanently into the Git repository.
HEAD:
HEAD is a pointer, which always points to the latest commit in the branch. Whenever we make a commit, HEAD is updated with the latest commit. The heads of the branches are stored in .git/refs/heads/ directory.
$ cat .git/refs/heads/master
570837e7d58fa4bccd86cb575d884502188b0c49
Revision:
Revision represents the version of the source code. Revisions in Git are represented by commits.
Git Installation
MAC
Install Homebrew and then install git using it
$ /usr/bin/ruby -e "$(curl -fsSL https://raw.githubusercontent.com/Homebrew/install/master/install)"
$ brew install git
Linux
Debian Systems
$ sudo apt-get install git
Red Hat Systems
$ sudo yum install git
Windows
Download Git from http://gitforwindows.org/ and install it.
Git Configuration
Setting username
$ git config --global user.name "Astik Anand"
Setting email id
$ git config --global user.email "astikanand@gmail.com"
Avoid merge commits for pulling
$ git config --global branch.autosetuprebase always
Git stores all global configurations in .gitconfig file, which is located in the home directory.
$ cat .gitconfig

List Git settings
$ git config --list
Adding SSH Key
Generate Public/Private RSA Key Pair
$ ssh-keygen
This will create a .ssh directory inside the home directory.
ssh-keygen has generated two keys, first one is private (i.e., id_rsa) and the second one is public (i.e., id_rsa.pub).
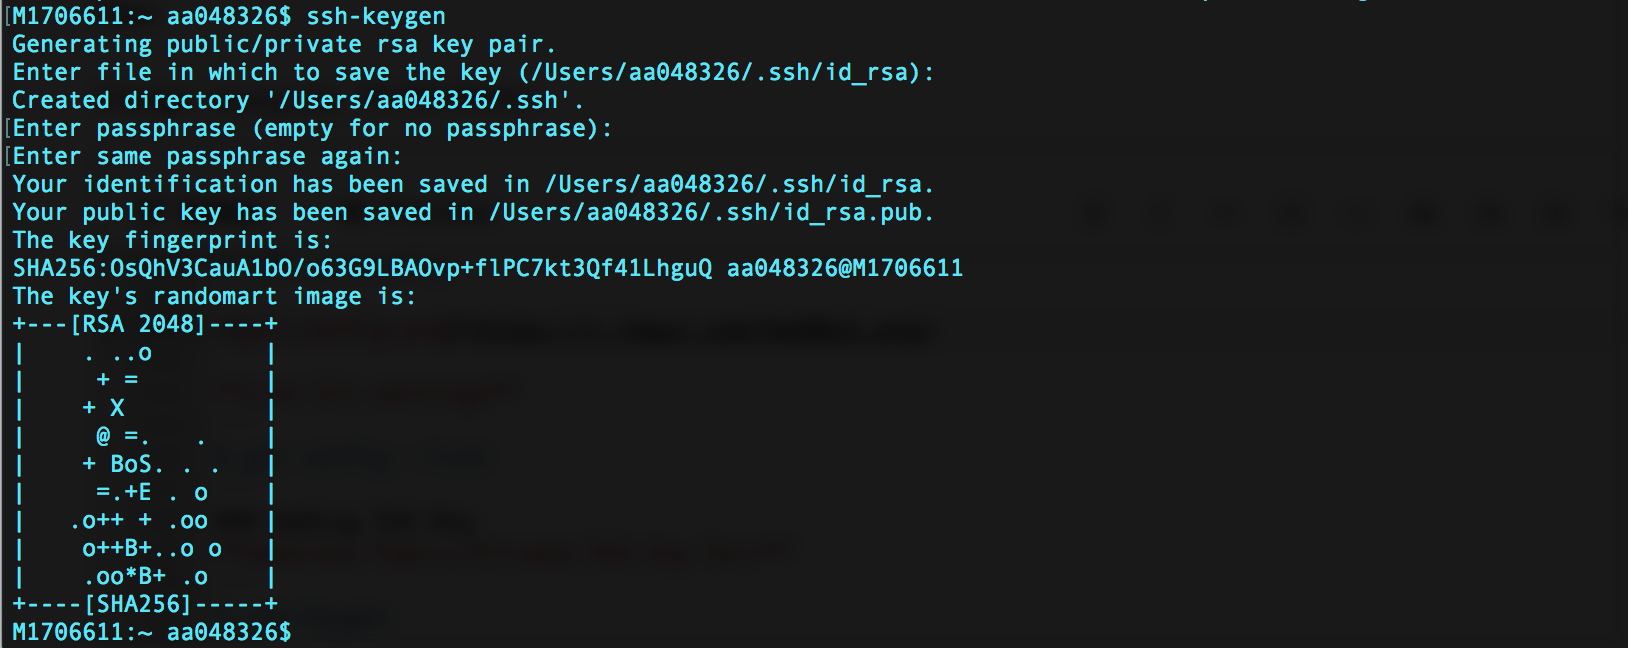
Note: Never share your PRIVATE KEY with others.
Adding Keys to authorized_keys
$ pbcopy < ~/.ssh/id_rsa.pub
- Once the key is copied to clipboard. Open the github website.
- In the upper-right corner of any page, click your profile photo, then click Settings.
- In the user settings sidebar, click SSH and GPG keys.
- Click New SSH key or Add SSH key. Give the title, paste the code and click Add SSH key.
- If prompted, confirm your GitHub password.
Now the configuration and setup is complete.
Git Work Flow
General workflow is as follows:
- Clone the Git repository as a working copy.
- Modify the working copy by adding/editing files.
- If necessary, update the working copy by taking other developer’s changes.
- Review the changes before commit.
- Commit changes and if everything is fine, push the changes to the remote repository.
- After committing, if something went wrong, then correct the last commit and push the changes to the remote repository.
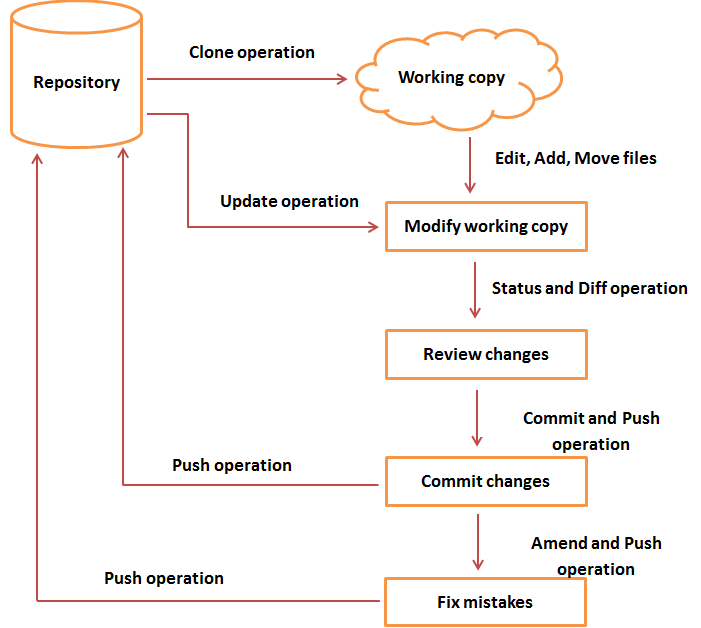
Create/Clone a repository
Initialize a new git repository: Go inside an existing directory or else simply create a new project directory.
$ mkdir my_project
$ cd my_project
Make this a git repository
$ git init

Create README.md file by below command, write about the project and hit CTRL+D to save.
$ cat > README.md

See the status of repository now.
$ git status

Add it to staging area and see the status again.
$ git add README.md
$ git status

To add all the files & folders at once use $ git add --a, to add all files and folders in current directory use $ git add . and to add multiple files and folders use $ git add dir1/ dir2/ file1.txt
Now, commit to local repository with appropriate message.
$ git commit -m "README added"
and check the status again.

Now, we need to push the changes to a remote repository. For that we are going to make a remote repository on GitHub
Creating a remote repository on Github
Open github.com and sign in to it and then create a New repository.

Now, enter the project name my_project give the Description(optional) and create.
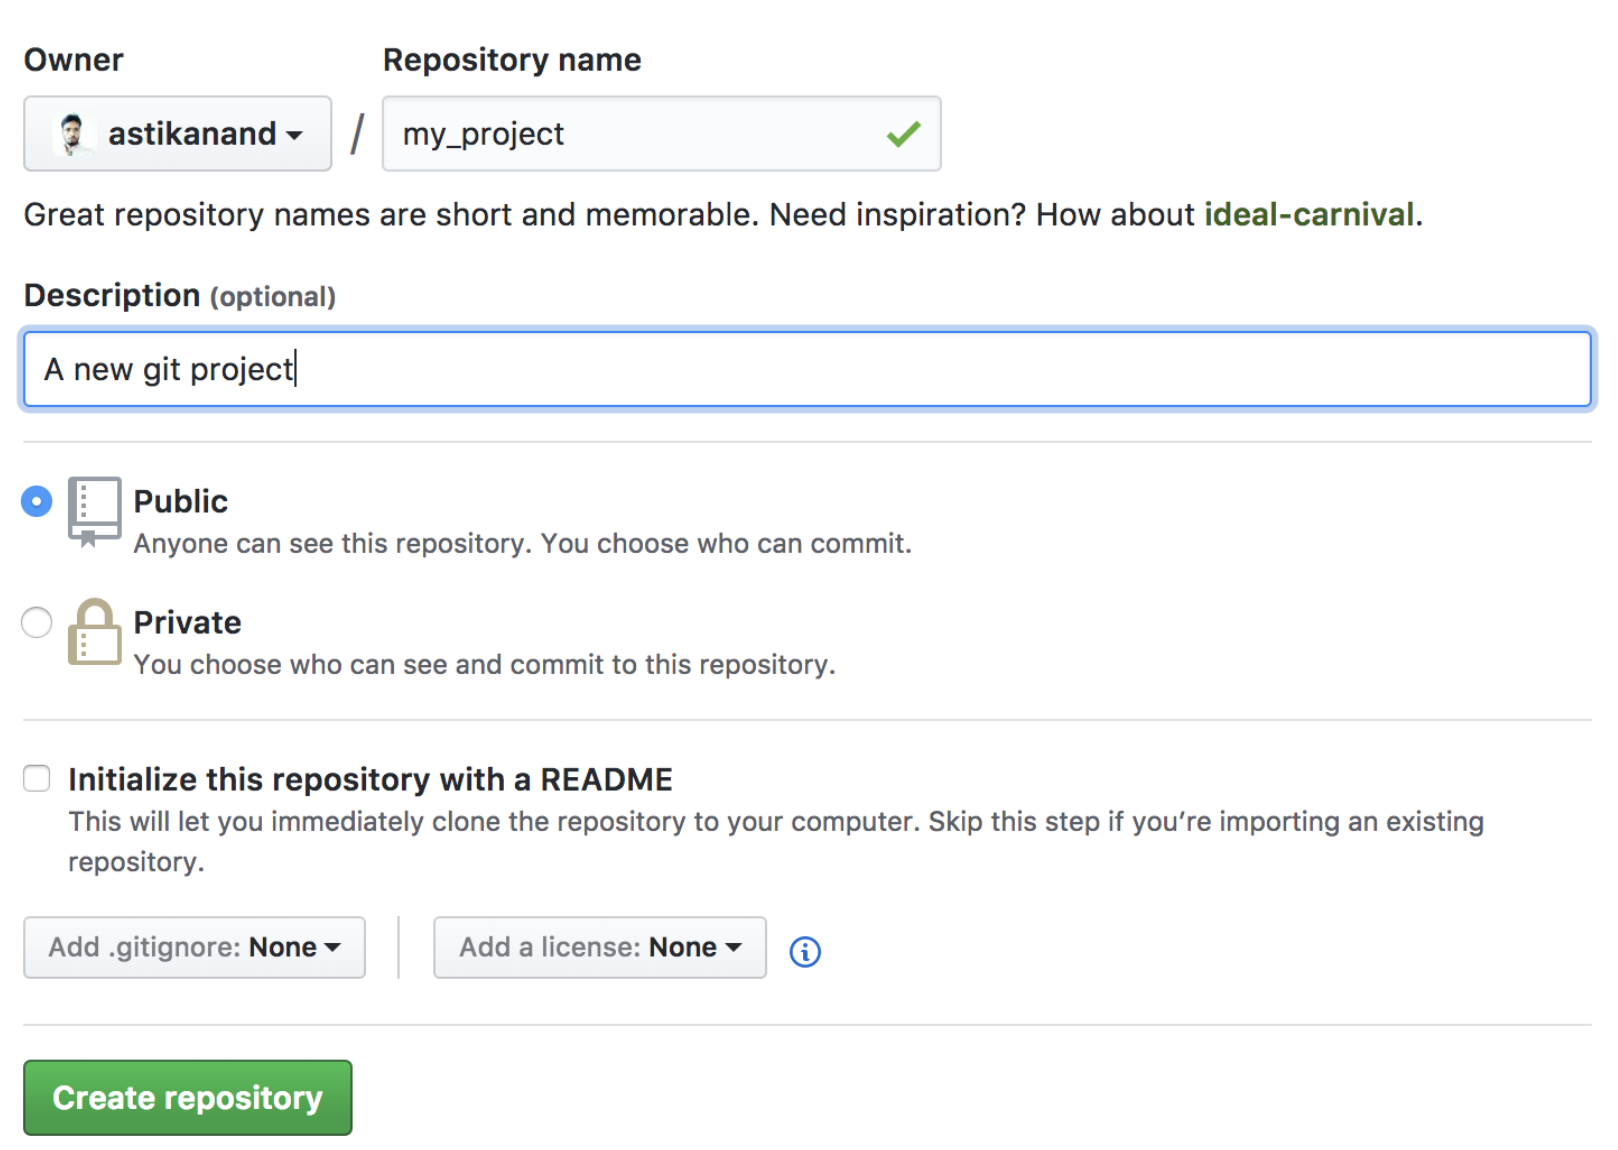
Now, as github remote repository is created, connect this remote repository to our local repository.
$ git remote add origin https://github.com/astikanand/my_project.git
Now, push local repository changes to remote repository.
git push -u origin master

Clone an existing git repository: If there is existing git repository just clone it.
$ git clone https://github.com/astikanand/my_sproject
Review Changes
Check log details using git log command
$ git log

View the commit details using git show command

Now, make some changes to the already commited README file. I am changing content from This is a new project. to This is a github project.
Reviews the changes by running the git diff command.
$ git diff

Update Operation
When more than one person is working on a single repository on a single branch, and if person1 checksout the project and starts working on that and meanwhile another person2 has updated that repository by pushing his own changes. Then there will be conflicts when person1 tries to push his changes. push will fail and changes will get rejected.
Because Git identified that remote repository and perosn1’s repository are not in sync. Because of this, he can lose the history of the project. To avoid this mess, Git failed this operation. Now, person1 has to first update the local repository and only thereafter, he can push his own changes later.
$ git pull
And if they were working on same file then there will be merge conflicts at time of pull and we need to resolve that manually.
Stash Operation
Suppose we are implementing a new feature for our product. Our code is in progress and suddenly a customer escalation comes. Because of this, we have to keep aside our new feature work for a few hours. So, we cannot commit our partial code and also cannot throw away our changes. So we need some temporary space, where we can store our partial changes and later on commit it.
In Git, the stash operation takes our modified tracked files, stages changes, and saves them on a stack of unfinished changes that we can reapply at any time.
Here we are creating a new file new.txt and adding it but not commiting.
$ cat > new.txt
$ git add new.txt
$ git status

It is showing that new.txt is to be commited.
Now do stash, see the stash list and check status again
$ git stash

Now, once escalation part is done and we again want to work on that same feature just pop the stash frm stack and start working.
$ git stash pop

and it again shows that new.txt is to be committed.
Fixing Mistakes
If we accidentally did some changes to the local repository and then wants to undo these changes. In such cases, the revert operation plays an important role.
Revert Unstaged Changes
If we have modified a file but not added to the staging area and we want to revert back to original file use checkout command.
$ git checkout file_name.txt
Using this method we can also get the deleted file.
Revert Changes from Staging Area
If we have modified any file and moved it to staging arera using git add command and now we want to revert back we can do this using checkout command by paasing an extra parameter HEAD pointer.
$ git checkout HEAD -- file_name.txt
If we want to remove the file from staging area before commit.
$ git rm --cached file_name.txt
If we want to see the diffrences from staging area.
$ git diff --cached
Reset operation for changes committed
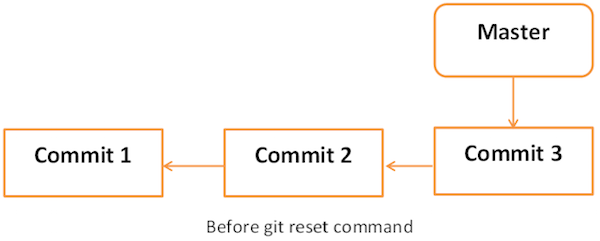
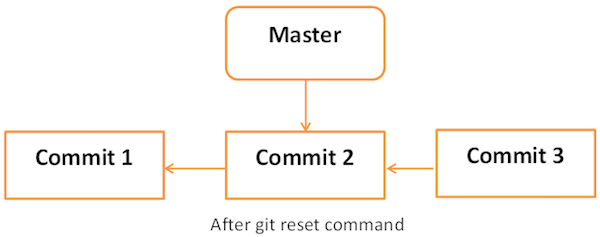
- Soft Reset
Each branch has a HEAD pointer, which points to the latest commit. If we use Git reset command with
--softoption followed by commit ID, then it will reset the HEAD pointer only without destroying anything.
.git/refs/heads/master file stores the commit ID of the HEAD pointer. We can verify it by using the git log -1 command.
See the last 2 logs and content of HEAD.
$ cat .git/refs/heads/master
$ git log -2

Now let us reset HEAD.
$ git reset --soft HEAD~
$ git status


It still shows file in staging area.
-
Mixed Reset Git reset with
--mixedoption reverts the changes from the staging area that have not been committed yet. It reverts the changes from the staging area only. The actual changes made to the working copy of the file are unaffected. This is default reset. -
Hard Reset If we use
--hardoption with the Git reset command, it will clear the staging area; it will reset the HEAD pointer to the latest commit of the specific commit ID and delete the local file changes too.
$ git reset --hard HEAD~2
Git Branching
Create branch
$ git branch new_branch
See all branches
$ git branch
Branch with * shows the current branch.

Switch branch
$ git checkout new_branch
$ git branch

Shortcut to create and switch to new branch $ git checkout -b another_branch

Delete Branch
Switch to another branch and before deleting.
$ git checkout master
$ git branch -D another_branch
$ git branch

Rename Branch
$ git branch -m new_branch test_branch
$ git branch

Merge branches
Switch to newly created branch, create a new file test.txt and then add and commit in that particular branch.
$ git checkout test_branch
$ git branch
$ cat > test.txt
$ git add test.txt
$ git commit -m "test file added"
$ git push --set-upstream origin test_branch
Note: --set-upstream needed only once for each newly created branch, therafter simply $ git push will work fine.


After commit, the changes in new test_branch it will look something like below.
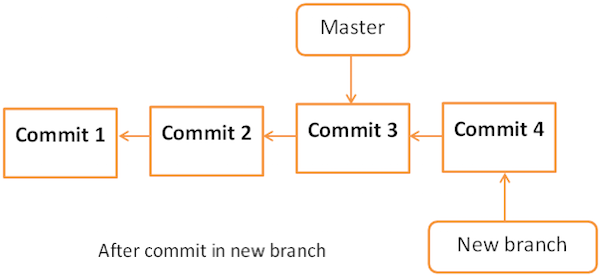
Switch to master branch and merge test_branch with the master now.
$ git checkout master
$ git branch
$ git merge test_branch

After merging the branches will look like below.
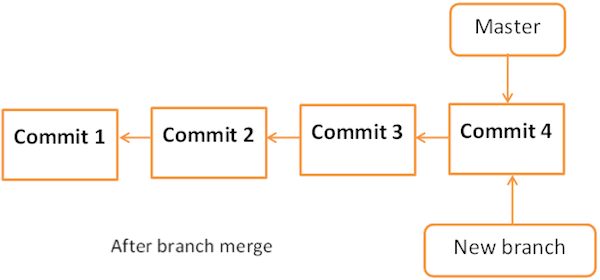
Miscellaneous Concepts
Squashing git commits
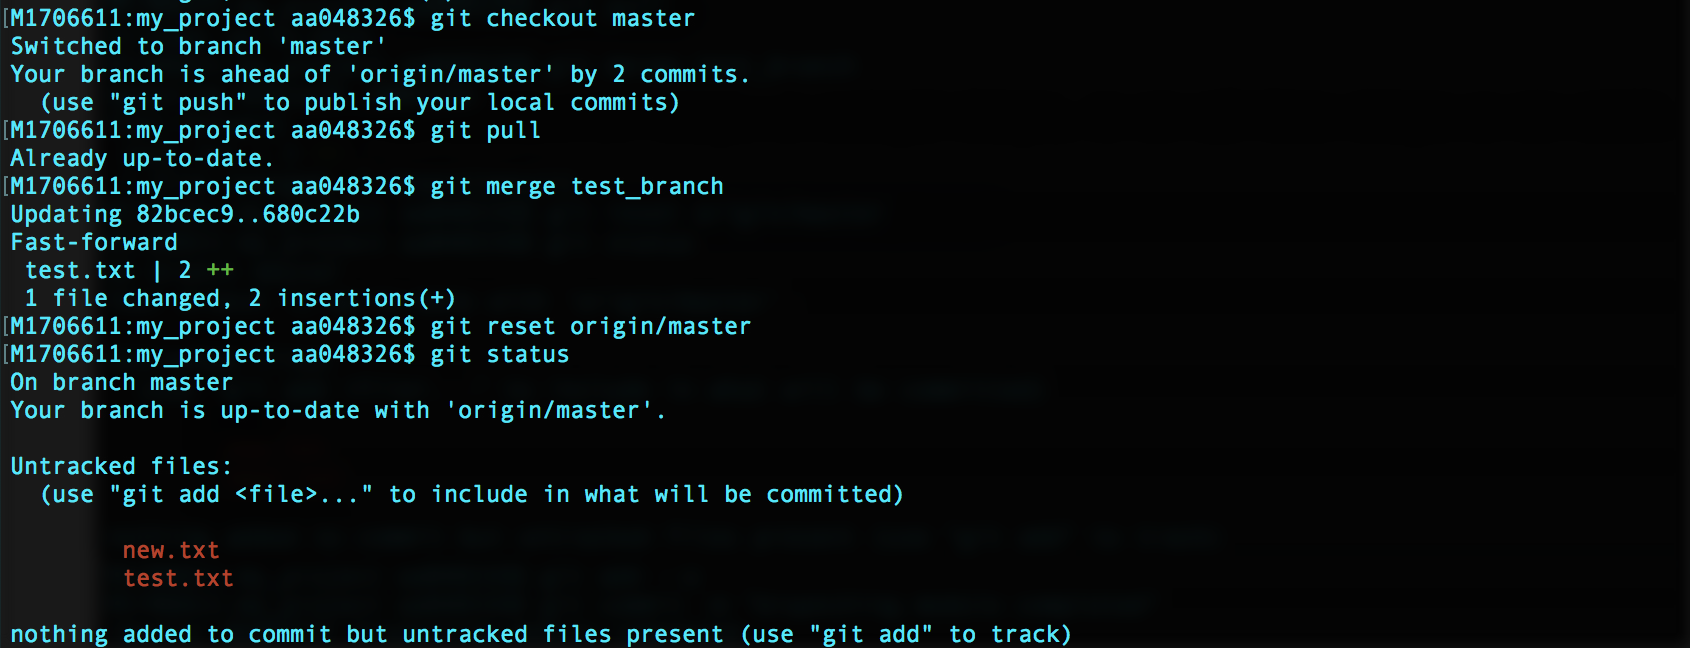
Switch to the master branch and make sure everything is up to date.
$ git checkout master
$ git pull
Merge the new branch into the master branch.
$ git merge test_branch
Reset the master branch to origin’s state.
$ git reset origin/master
Git now considers all changes as unstaged changes, we can add these changes as one commit.
$ git add --a
$ git commit -m "branching module completed"
